
Automatically create an online staff reimbursement claim workflow producing one PDF document per claim including all of the supporting documentation.
So, this has been a back burner project.
Not the form and subsequent output documents – but how to merge these documents automatically. A lot of schools who use an online claim form have to find & download the documents to Adobe and combine them before sending them off to the powers that be for authorization. It’s not the end of the world, but it is another one of those annoying tasks.
My goal is not only automatically create one PDF but also email it to the accounts department and/or send it through to Hubdoc for the XERO > ApprovalMax workflow.
I obviously haven’t had much success, like I said, it’s been a backburner project.
Recently a few ‘stars’ have come into alignment with my logic & thought process. As well as being spurred on by some questions posted in the Canterbury Regional School Business Managers group, another workflow using a different approach came in to play and something that was said at a Hubdoc PD session all coalesced in my brain & something like an idea ‘clicked’. So, I thought it might be timely to relook at this challenge.
Frustration is my motivation, and this has been very frustrating. I have spent hours poring over different posts all saying that is it impossible to create a document using an image from google drive. Hmmm … ok, what to do next? I’ve invested too much time, come to far to give up and am not ready to admit defeat. It was all about the substitute function and google drive.
Then I had a breakthrough, someone on the Autocrat Forum posted a question about images & Joe Gluyas (God bless him!!) posted a reply, his code was slightly different to mine. When I copied that little bit into my formula it changed everything! I won’t go in to too much details but changing the formula from
=arrayformula(split(if(row(A:A)=1,”Doc1,Doc2,Doc3,Doc4,Doc5″,substitute(trim(AB:AB),”drive.google.com/open?”,”docs.google.com/uc?sharing=view&”)),”, “,TRUE,TRUE))
to
=arrayformula(if(A:A=””,,split(if(row(A:A)=1,”Doc1,Doc2,Doc3,Doc4,Doc5″,substitute(trim(AB:AB),”drive.google.com/open?”,”docs.google.com/thumbnail?sz=w640&”)),”, “,TRUE,TRUE)))
Changing the “drive.google/open?” to “docs.google.com/thumbnail? made all the difference. This also captures PDFs and Word documents, which means that if they show on my sheet then they will print on the final PDF document. So the theory goes, and yes, it does work.
The last piece to the puzzle is making sure that the destination folder for the uploads is set to “anyone with the link can view” – this then in effect makes the folder ‘public’ and the files stored can be published as one document.
Success!
If you’re interested and want something similar to your school here are the steps I took.
Utilising:
Forms
Sheets
- Forms
- Sheets
- Docs
- Hubdoc/XERO/ApprovalMAx
- A couple of extreme ☠ formulas
- Google Add-ons
- Dynamic Data (Forms add-on)
- Autocrat (Sheets add-on)
Limitations:
There is nothing worse than starting a workflow and realising it won’t quite work how you wanted it to. Ideally these types of workflow should be in a Shared/Team Drive, but because the add-ons require an owner for their trigger service they must be ‘housed’ in My Drive. The created files can be sent to a folder in Shared Drive.
Create Form
Set-up your form (based on Physical document if you can, this helps staff to transition)
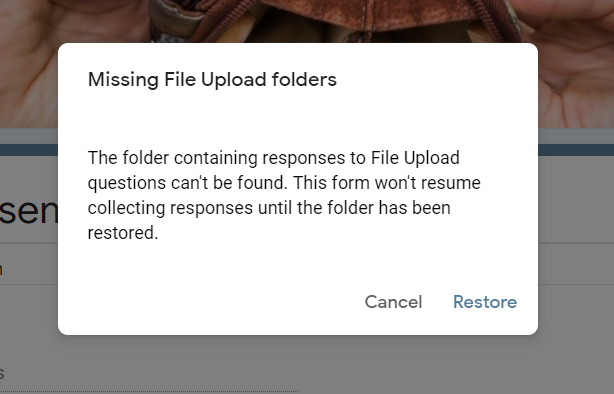
Copy my example form and change it to suit your own needs (if using this “Restore” the Missing File Upload folders), firstly make sure you are in the correct folder of Drive before doing this, then the file responses and uploads will end up in the ‘right space’.


Make sure you set data validation on the bank account field and remember to set ‘required’ on fields that need to be.
Note:
The number of upload options are 1, 5 or 10 (I have allowed for 5)
Select the type of files allowed and maximum size (Doc,Photo & PDF max size 10mb)
Once you have created the folder for the uploads, open it, change the sharing settings to “Anyone with the link” can view. This is very important or the attachments will not print on the completed document.

Format Form Responses Sheet
Create new 4 new Sheets in the workbook:
- Budgets / GL Codes or something similar
- QR Code & URLs
- Bank Accounts
- Troubleshooting – this is purely for you, when things go wrong, write a note here. Especially record, what happened/why it happened/how was it solved.
Set-up the Budgets sheet
The quickest way to do this is export the Chart of Accounts from Xero/Accounting Package.
Remove ledger codes – ones that are not needed for this (eg. Balance Sheet items / Wage items etc). This forces your staff members to use the correct codes.
In Column the next free column to the right of your GL Code data paste this formula at the top
={“Description”;ARRAYFORMULA(if(A2:A=””,,B2:B&” – “&A2:A))}
This will help the Hubdoc/Xero learn and recognise codes for future documents 🤞.
Set-up the QR Code & URLs sheet
Copy the shortened URL of the Form and paste the link into Cell B1

Copy this formula into Cell B6
=image(“https://chart.googleapis.com/chart?chs=150×150&cht=qr&chl=”&B3)Where B3 is the cell that has the form URL information.

Copy and paste the QR code into another cell to turn it into static data

Set-up the Bank Accounts Sheet
If you have a payroll database/sheet that contains staff bank accounts then you can use importrange to bring in the data and compare it with the bank account supplied using a vlookup formula, or if no account is supplied via the form then you could return the bank account from the pay records … this will take more time to set-up & could be part of another longer term project.
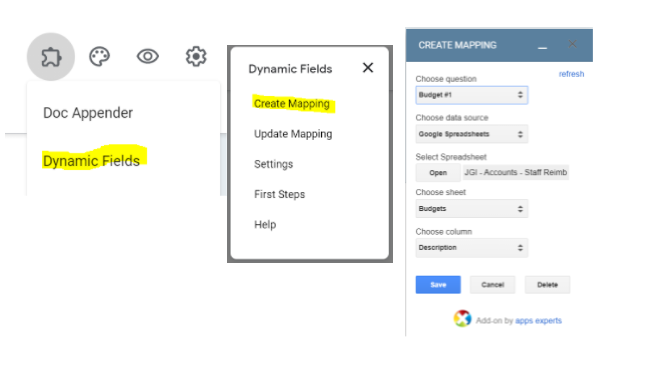
Set-up Dynamic Fields Add-on
Return to the form:
- Add/Open the Dynamic Fields add-on
- Create Mapping
- Choose Question to be mapped & destination (this is the sheet where all of the budget codes are)
- Re-open the Dynamic Fields add-on and Select Update Mapping. This will pre-populate all of the budget options. Hint: Make sure these fields are dropdowns, not multi or tick boxes.
Columns & formulas to add to the Sheet:
Add 5 new columns to the immediate right of the form data columns, enter this formula in the first row of the first Column.
=arrayformula(if(A:A=””,,split(if(row(A:A)=1,”Doc1,Doc2,Doc3,Doc4,Doc5″,substitute(trim(AB:AB),”drive.google.com/open?”,”docs.google.com/thumbnail?sz=w640&”)),”, “,TRUE,TRUE)))
Note: Column AB is the reference to where the URLs of the supporting documents are kept. You may need to change this cell reference to whichever Column this pertains to in your sheet.
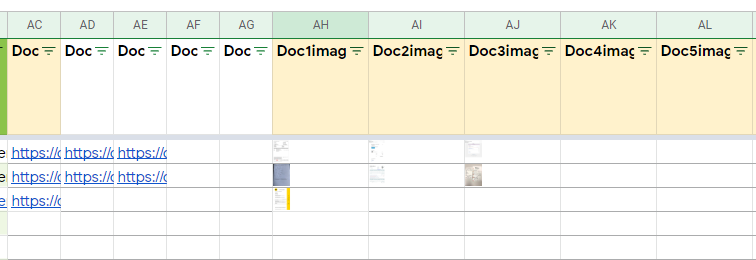
Add another 5 Columns and enter these formulas in each of them:
={“Doc1image”;ARRAYFORMULA(if($A1:$A=””,,hyperlink(AC2:AC,image(AC2:AC))))}
={“Doc2image”;ARRAYFORMULA(if($A1:$A=””,,hyperlink(AD2:AD,image(AD2:AD))))}
={“Doc3image”;ARRAYFORMULA(if($A1:$A=””,,hyperlink(AE2:AE,image(AE2:AE))))}
={“Doc4image”;ARRAYFORMULA(if($A1:$A=””,,hyperlink(AF2:AF,image(AF2:AF))))}
={“Doc5image”;ARRAYFORMULA(if($A1:$A=””,,hyperlink(AG2:AG,image(AG2:AG))))}
While these aren’t used in the mail merge – they are an immediate representation of whether or not the formula has worked for the previous 5 columns. If not then there maybe something wrong with an upload.
Set-up Google Docs Template
Using Google Docs, set up your template with the merge field tags, if using Autocrat the merge fields must be formatted as <<merge field data>>. As long as your merge fields match the sheet headings you won’t have to worry about mapping in the wizard.
Can’t be bothered? A copy of my template can be found here.
Set-up Autocrat
- Open the add-on > select NEW JOB > give the job a meaningful name.
- Select the template created from drive
- Map source data to template
- Scroll down to the Supporting Documentation Fields – change the field type from Standard to Hyperlink so that the uploads can be viewed on the final document even in PDF format.
- Change the Field type for the Doc1, Doc2, Doc3,Doc4, Doc5 fields to Image. Don’t worry about the size as we have dealt with that in the original formula with the sz=w640, anything bigger will slow Autocrat down causing the file to be too big to embed in the finished document.
- Provide the naming convention for the created files, use the merge fields to give meaningful data. You can access merge fields via the Blue slider on the left, select and paste the field in the file name.
- Select output type as PDF and Multiple documents
- Choose Destination folder
- Choose Dynamic folder reference if you have one set-up.
- Set Merge condition – this is helpful if you have several formulas running. Sometimes the add-on runs before the formulas have finished populating fields. The result is less than satisfactory when this happens.
- Share docs & send emails. This is the step where you can directly email the result to Hubdoc, Accounts department, Xero (if you don’t use Hubdoc) and cc’d to the original claimant for their records.
- Set the add-on triggers to run with a time trigger – you can set it to just run on form submit but I don’t recommend it for reasons stated earlier.
Remember to save the job!!
TEST TEST TEST!!!
Now you are ready to test your workflow – before sending live information out. Once you’re happy with the results and information flow, re-open autocrat and add the email address you want the document to send to – ie yourschoolname.school@app.hubdoc.com or accounts@yourschoolname.school.nz etc.
If unsure of where to find the Hubdoc address > Settings cog > Organisation > Copy to Clipboard

For more complex workflows – like separating between payroll and accounting type claims you can add more formula based ‘helper’ columns that determine the type of claim of each submission and who it gets sent to. Remember to add another Job in Autocrat to run this.
Deploy to the masses:
Make a poster with the QR code (iPhone & some Android users can use their cameras, others will have to download a QR code scanner app) or add to your intranet page etc.
To test my workflow use this QR code and watch your inbox for a newly created staff reimbursement claim.

Need a pictorial & detailed set of instructions? Just click here.
Next steps & some ideas for similar workflows:
- Combine a medical certificate with a Leave Request
- Combine ID with Non Teaching staff/Volunteer Police Vetting form
- Produce International Student ID cards (Primary School)
- Combine ID with New Employee Profile Doc.